前言
flutter 算是当前最火热的跨端技术了,能够使用同一套代码轻松接入到 iOS 及 Android 甚至是 Web,那么把 flutter 集成到原有的项目中一定是当前最快速及有效的应用 flutter 的方案。下面我记录一下我集成 flutter 及阿里的开源项目 flutter_boost 的方法。
集成 flutter
本例子代码集成到github 集成环境
flutter: 1.5.8
flutter_boost 0.1.54
2
新建及配置项目
新建一个 flutter 项目,项目必须是 flutter 混编到已有项目的模式
flutter create -t module flutter_module
新建一个 iOS 项目,或修改原有的 iOS 项目,在 Podfile 中修改
target 'firstApp' do
  ...
  flutter_application_path = './flutter_module'
  eval(File.read(File.join(flutter_application_path, '.ios', 'Flutter', 'podhelper.rb')), binding)
  ...
end
2
3
4
5
6
'./flutter_module'是本地 flutter 项目的地址,我的 flutter 项目就在 iOS 项目的目录下(跟 Podfile 文件同级),也可以使用绝对地址,然后运行pod install。
然后在项目的 Build Parse 的 Run Script 中添加
"$FLUTTER_ROOT/packages/flutter_tools/bin/xcode_backend.sh" build
"$FLUTTER_ROOT/packages/flutter_tools/bin/xcode_backend.sh" embed
2
没有 Run Script 的点击+新建一个,然后启动 iOS 项目。
修改 iOS 代码
在 AppDelega.m 中
- (BOOL)application:(UIApplication *)application didFinishLaunchingWithOptions:(NSDictionary *)launchOptions {
    ...
    [GeneratedPluginRegistrant registerWithRegistry:self];
    return YES;
}
2
3
4
5
添加按钮到 ViewController.m
- (void)viewDidLoad {
    [super viewDidLoad];
    UIButton *fbutton = [UIButton buttonWithType:UIButtonTypeCustom];
    [fbutton addTarget:self
               action:@selector(routerTo)
     forControlEvents:UIControlEventTouchUpInside];
    [fbutton setTitle:@"通过Flutter跳转" forState:UIControlStateNormal];
    [fbutton setBackgroundColor:[UIColor blueColor]];
    fbutton.frame = CGRectMake(80.0, 410.0, 160.0, 40.0);
    [self.view addSubview:fbutton];
}
2
3
4
5
6
7
8
9
10
11
在 ViewController.m 中添加按钮点击事件并 push 到 flutter 页面,并在 flutter 页面上方添加一个按钮返回到 Native 页面
- (void)routerTo{
    FlutterViewController *flutterViewController = [[FlutterViewController alloc] init];
    UIButton *button = [UIButton buttonWithType:UIButtonTypeCustom];
    [button addTarget:self
               action:@selector(handleButtonAction)
     forControlEvents:UIControlEventTouchUpInside];
    [button setTitle:@"返回" forState:UIControlStateNormal];
    [button setBackgroundColor:[UIColor blueColor]];
    button.frame = CGRectMake(80.0, 210.0, 160.0, 40.0);
    [flutterViewController.view addSubview:button];
    flutterViewController.view.backgroundColor = [UIColor cyanColor];
    [flutterViewController setInitialRoute:@"route1"];
    [self presentViewController:flutterViewController animated:NO completion:nil];
}
- (void)handleButtonAction{
    [self dismissViewControllerAnimated:YES completion:nil];
}
2
3
4
5
6
7
8
9
10
11
12
13
14
15
16
17
主要用了 presentViewController 及 dismissViewControllerAnimated 方法进行跳转及返回。
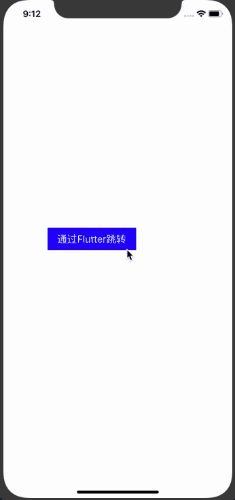
预览:
iOS 集成 flutter_boost
flutter 配置 flutter_boost
下载 flutter_boost,在 pubspec.yaml 添加
flutter_boost: 0.1.54
执行flutter pub get
在 lib/main.dart 文件中修改: 添加
FlutterBoost.singleton.registerPageBuilders({
  'first': (pageName, params, _) => MyHomePage(),
  'second': (pageName, params, _) => SecondPage(),
});
2
3
4
及在 MaterialApp 中修改
builder: FlutterBoost.init(),
完整代码大致如下:
import 'package:flutter_boost/flutter_boost.dart';
...
void initState() {
// TODO: implement initState
super.initState();
FlutterBoost.singleton.registerPageBuilders({
'first': (pageName, params, _) => MyHomePage(),
'second': (pageName, params, _) => SecondPage(),
});
}
Widget build(BuildContext context) {
return MaterialApp(
title: 'Flutter Demo',
builder: FlutterBoost.init(),
theme: ThemeData(
primarySwatch: Colors.blue,
),
home: MyHomePage(title: 'Flutter Demo Home Page'),
);
}
...
2
3
4
5
6
7
8
9
10
11
12
13
14
15
16
17
18
19
20
21
22
修改 iOS 代码
新建 MyFlutterRoute.h 文件
#import <Foundation/Foundation.h>
#import <UIKit/UIKit.h>
#import <flutter_boost/FlutterBoost.h>

NS_ASSUME_NONNULL_BEGIN

@protocol FLBPlatform;
@interface MyFlutterRouter : NSObject<FLBPlatform>
@property (nonatomic,strong) UINavigationController *navigationController;
@end

NS_ASSUME_NONNULL_END
2
3
4
5
6
7
8
9
10
11
12
新建 MyFlutterRoute.m 文件
#import "MyFlutterRouter.h"
#import <flutter_boost/FlutterBoost.h>

@interface MyFlutterRouter()
@end

@implementation MyFlutterRouter


- (void)open:(NSString *)name
   urlParams:(NSDictionary *)params
        exts:(NSDictionary *)exts
  completion:(void (^)(BOOL))completion
{
    BOOL animated = [exts[@"animated"] boolValue];
    FLBFlutterViewContainer *vc = FLBFlutterViewContainer.new;
//    self.navigationController=[[UINavigationController alloc]initWithRootViewController:vc];
    [vc setName:name params:params];
    [self.navigationController pushViewController:vc animated:animated];
    if(completion) completion(YES);
}

- (void)present:(NSString *)name
      urlParams:(NSDictionary *)params
           exts:(NSDictionary *)exts
     completion:(void (^)(BOOL))completion
{
    BOOL animated = [exts[@"animated"] boolValue];
    FLBFlutterViewContainer *vc = FLBFlutterViewContainer.new;
    [vc setName:name params:params];
    [self.navigationController presentViewController:vc animated:animated completion:^{
        if(completion) completion(YES);
    }];
}

- (void)close:(NSString *)uid
       result:(NSDictionary *)result
         exts:(NSDictionary *)exts
   completion:(void (^)(BOOL))completion
{
    BOOL animated = [exts[@"animated"] boolValue];
    animated = YES;
    FLBFlutterViewContainer *vc = (id)self.navigationController.presentedViewController;
    if([vc isKindOfClass:FLBFlutterViewContainer.class] && [vc.uniqueIDString isEqual: uid]){
        [vc dismissViewControllerAnimated:animated completion:^{}];
    }else{
        [self.navigationController popViewControllerAnimated:animated];
    }
}
@end
2
3
4
5
6
7
8
9
10
11
12
13
14
15
16
17
18
19
20
21
22
23
24
25
26
27
28
29
30
31
32
33
34
35
36
37
38
39
40
41
42
43
44
45
46
47
48
49
50
在 AppDelega.h 中添加 flutter_boost 并继承 FLBFlutterAppDelegate
#import <UIKit/UIKit.h>
#import <Flutter/Flutter.h>
#import <flutter_boost/FlutterBoost.h>
#import "ViewController.h"
@interface AppDelegate : FLBFlutterAppDelegate <UIApplicationDelegate>
@property (strong, nonatomic) UIWindow *window;
//用来保存app的路由
@property (strong, nonatomic) UINavigationController *navController;
@end
2
3
4
5
6
7
8
9
然后在 AppDelega.m 中修改
- (BOOL)application:(UIApplication *)application didFinishLaunchingWithOptions:(NSDictionary *)launchOptions {

    // 代码是将首页指向ViewController并初始化UINavigationController
    UIWindow *window = [[UIWindow alloc] initWithFrame:[UIScreen mainScreen].bounds];
    self.window = window;
    ViewController *vc = [ViewController new];
    UINavigationController *nav=[[UINavigationController alloc] initWithRootViewController:vc];
    [nav setNavigationBarHidden:(YES) animated:(NO)];
    self.window.rootViewController =nav;
    [self.window makeKeyAndVisible];

    // 初始化flutter_boost并给MyFlutterRouter初始化navigationController
    MyFlutterRouter *router = [MyFlutterRouter new];
    router.navigationController=nav;
    [FlutterBoostPlugin.sharedInstance startFlutterWithPlatform:router
                                                        onStart:^(FlutterEngine *fvc){
     }];
}
2
3
4
5
6
7
8
9
10
11
12
13
14
15
16
17
18
然后在 ViewController 中添加按钮并添加跳转事件
...
    UIButton *button = [UIButton buttonWithType:UIButtonTypeCustom];
    [button addTarget:self
               action:@selector(flutterBoostRoute)
     forControlEvents:UIControlEventTouchUpInside];
    [button setTitle:@"通过Flutter Boost跳转" forState:UIControlStateNormal];
    [button setBackgroundColor:[UIColor blueColor]];
    button.frame = CGRectMake(80.0, 210.0, 200.0, 40.0);
    [self.view addSubview:button];
...
- (void)flutterBoostRoute{
    //通过FlutterBoostPlugin插件跳转,最终会调用MyFlutterRoute的open方法
    //或者present方法(urlParams传参@{@"present":YES,kPageCallBackId:@"MycallbackId#1"})
    [FlutterBoostPlugin open:@"second" urlParams:@{kPageCallBackId:@"MycallbackId#1"} exts:@{@"animated":@(YES)} onPageFinished:^(NSDictionary *result) {
        NSLog(@"call me when page finished, and your result is:%@", result);
    } completion:^(BOOL f) {
        NSLog(@"page is opened");
    }];
}
2
3
4
5
6
7
8
9
10
11
12
13
14
15
16
17
18
19
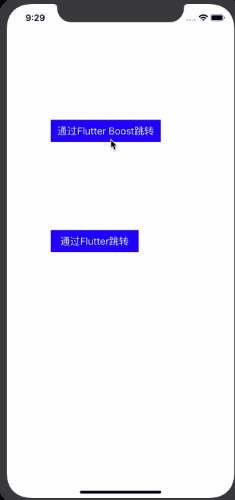
效果: